Facebook has made a number of changes recently to business and individual pages alike, so we’ve endeavoured to upgrade this post from 2012 to show you how to natively moderate your business page.
It’s much easier now than it ever has been to get an idea of exactly how many messages and comments your page has received thanks to the Admin Panel, which can be found at the top of your company page.

The Page button will take you directly to your page’s timeline, shown above. Clicking on messages will allow you to view all your private messages, as well as write new ones. Finally, Notifications, arguably the most important menu of all, shows you new comments on your page, as well as any likes on your page, and shares of your content.
When you have unread messages, likes, or page comments, you will see a number next to the corresponding button in the admin panel. For example, in the below screenshot, I can clearly see that I have seven unread notification:
![]()
Notifications – All
The first thing I’ll cover is how to moderate from the Notifications menu. Click on Notifications to see a list of activity from your page, including shares of your content to someone else’s timeline and likes.
Comments, likes, and posts can all be easily differentiated in this activity list by the small flag associated with each. Below are the three types of flags you will see for different page activities:
Clicking on the published post will take you to a pop out box with the comment. I’ve highlighted here the post I’m clicking on:
..it will open this dialogue:
From this box, you can delete the post by clicking on the upside down carat in the upper right hand corner and then clicking on delete (you will be prompted to verify that you want to delete a post)…
… and you can also also like, comment on, and share the content with your followers:
If a post to your page receives any comments, they will also be shown to you as notifications. Clicking on the comment from the activity feed will you show the original (parent) post and all comments below it. In this case, we only have three comments:
From here, you can like the comment, and reply inline to it (note that clicking on the Write a Comment box below the comment will add your reply to the parent post and not as a reply to the comment itself):
You can also hide the post, if necessary, by clicking on the X in the upper right hand corner of the comment box. The X will only show up when your mouse is over it:
You will receive confirmation that the post has been hidden, and are given the option to ban the user, to unhide the post if you’ve made a mistake, to delete the post entirely (hiding means it’s still visible to the user who posted it and to their friends), and to report the user to Facebook:
If it’s easier for you to sort through each of these notification options separately, you can filter your activity feed to only show you Likes, Comments, or Shares at one time by clicking on the appropriate section to the left of the page:
Notifications – Requests
It is possible for fans of your page to request information such as a phone number from you if that information is not listed on your site. These kinds of requests would show up under this menu.
You will likely not need to use this as you should have already provided all the information your potential customers would need to get in touch with you on your page… Right?
Notifications – Activity
Activity is where you can see any shares of your content, and any brand page mentions. As with the other menus, this activity will be listed out in a timeline so you can see when your content was shared, or when your brand was mentioned; and the actual content of the share, or the content of the mention.
Don’t skip this section! It’s easy to forget that it’s there, but it should be a part of any regular moderation sweep. Note that while it’s important that you keep up with what’s being said about your brand by visiting this part of the notifications menu regularly, you can’t delete mentions of your brand, and you can’t stop someone from sharing your content.
Messages
Next up, we’ll take a look at the messages menu. This should be familiar territory, but there are a few updates that you’ll need to know about in order to get all of your incoming messages.
There are multiple message categories to the left of the screen. All messages to a business page will go to the inbox, but if you send a private message to someone that isn’t following your page, you may want to alert them that the message may automatically go to the Other folder. If it does go there, the user is not alerted that they even have a message (Thanks, Facebook!). I’ll cover the other two categories (Spam, Archive) below.
Clicking on a message will bring up a pop-out box containing the message, a reply box, and a newer feature known as Saved Replies:
Saved Replies are answers that you use most frequently to respond to your customers. They are already formatted with the person’s name, and all you have to do to send them is click on them. Easy peasy! Facebook provides you with a few Saved Replies to get you started, but you can create your own by clicking on ‘Create new reply’
If you type the same message over and over, this is a great way for you to save some precious time.
If you want to reply in the more traditional way, simply click on the ‘Write a reply…’ box below the message:
Note that you can also add images, links, and emojis to your reply by clicking on the buttons just below the ‘Write a reply…’ box. Clicking on ‘Reply’ in the lower right hand corner sends the message.
Once you are done responding to your message (or ignoring it, as the case may be), it’s possible to move it out of your inbox and into another message category, primarily Archive and Spam. It’s also possible to delete your messages from the thread so you no longer see them, but note that this does not delete the messages from the recipient’s end…
There is no way to do that.
To accomplish all of this, simply click on the ‘Actions’ drop down menu in the top bar of the message itself:
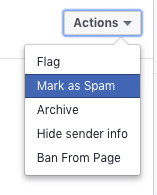
Here, moving the message to the Spam folder is easy. All you have to do is click on ‘Mark as Spam’ and now the message will be out of your inbox, and only available in your spam folder.
The same holds true for archived messages. Once you archive a message using this drop down, it will only be available in the ‘Archived’ folder.
You can also report a message to Facebook from here, especially if it’s vulgar, abusive, or threatening.
Facebook has made great strides in the last few years in listening to what business pages need, and have made it easy for you and your team to moderate and perform basic community management tasks on your page. Just remember: When in doubt, check every section and make sure you’re up to date on what’s going on on your page.